Managing Bookings
Table of contents:
- Introduction
- Understanding "graphs"
- Understanding "actions"
- 1. Creating a booking
- 2a. Performing an action: decline
- 2b. Performing an action: confirm
- 3. Retrieving booking data
Introduction
Timekit's booking engine is a hosted and flexible solution to handle booking flows for your app. Bookings can follow different graphs, which are a pre-defined set of steps that can trigger actions upon state change, such as sending out emails or trigger webhooks. The booking engine has graphs for many different use cases, such as instant bookings, bookings that need confirmation, bookings that involve a payment step, bookings that involve groups or classes etc.
Understanding "graphs"
Graphs are the "blueprints" that bookings are based on. They define different actions and transitions that bookings can go through, based on your business logic. If you are looking to set up a 1-to-1 booking flow, currently there are two graphs available:
instant- Instant booking where new bookings are auto-confirmedconfirm_decline- New bookings start in a tentative state and you can either confirm or decline them.
If you are looking to set up a 1-to-many, or group, booking flow, you should read our guide on groups and classes.
When you create a booking, you chose which flow graph it should follow. A JSON representation of the flow graphs can be retrieved by calling this endpoint and a Graphviz PNG representation of the flow by calling this instead.
Groups or classes?
If you need multiple users to book the same resources (like signing up to a class or group session), you should take a look at our "Groups and classes" guide, where we go through how to set up a group booking flow.
Understanding "actions"
Actions are transitions between steps in your graph, such as confirming, cancelling or rescheduling a booking. Some actions are triggered manually by you through the API, where others are autoplaying (internal steps) that happen automatically in a sequence. For instance, when you call the "confirm" action, the booking engine could automatically create a calendar event, send out an email notification and trigger a webhook before reaching the "confirmed" state.
Every time you want to move a booking further down the graph, you trigger the next action using the [PUT] /bookings/:id/:action endpoint. When creating a booking you can trigger the first action at the same time, saving you an additional [PUT] /bookings/:id/:action request.
As an example, when creating a booking, you also need to supply event details and customer info, though this information isn't actually used by the first action in the graph. The data supplied to the event parameter will be used to create an actual event in Timekit (internally calling [POST] /events) and the data in customer will be saved as a linked entity (only "name" and "email" is required).
Action settings
Some actions have settings that you can pass to them, e.g. whether an "autoplay" action in the call-chain should be enabled or not (sending out emails, trigger webhooks etc). These actions take inputs through a key, which usually corresponds to the actions name. See the reference for the individual graph for an overview.
1. Creating a booking
For this guide, we will create a booking based on the confirm_decline graph.
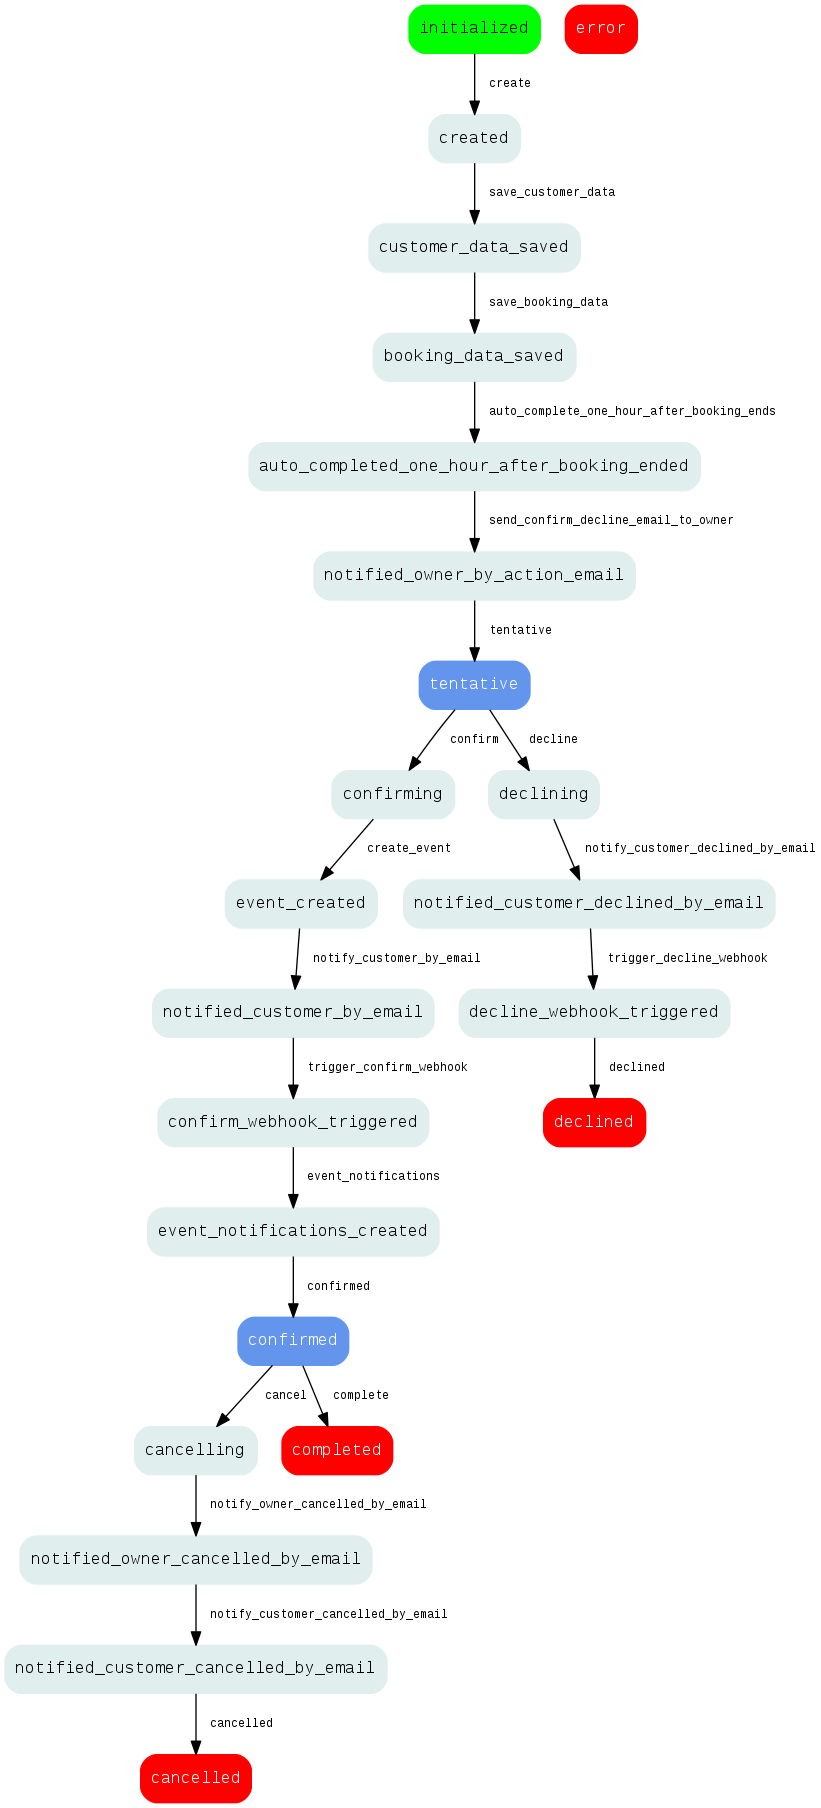
Here's a diagram representation of how that looks:

Confirm/decline flow graph
You can read an explanation here
Okay, let's get to it - start by calling [POST] /bookings with this:
# Request example (replace :calendar-id)
# [POST] /bookings
curl -X POST \
     -H 'Timekit-App: back-to-the-future' \
     -u [email protected]:nvHfRSlhvsnlg4rS7Wt28Ty47qdgegwSu3YK7hPW \
     -d '{
          "graph": "confirm_decline",
          "action": "create",
          "event": {
            "start": "2015-03-01T08:00:00+00:00",
            "end": "2015-03-01T13:00:00+00:00",
            "what": "Mens haircut",
            "where": "Sesame St, Middleburg, FL 32068, USA",
            "calendar_id": ":calendar-id",
            "description": "Please arrive 10 minutes before you time begin"
          },
          "customer": {
            "name": "Marty McFly",
            "email": "[email protected]",
            "phone": "1-591-001-5403",
            "voip": "McFly",
            "timezone": "America/Los_Angeles"
          }
        }' \
     https://api.timekit.io/v2/bookings
// Request example
// [POST] /bookings

var timekit = require('timekit-sdk');

timekit.configure({
  app: 'docs',
  outputTimestampFormat: 'Y-m-d H:i:s'
});

timekit.setUser('[email protected]', 'FluxCapacitator');

timekit.createBooking({
  "graph": "confirm_decline",
  "action": "create",
  "event": {
    "start": "2015-03-01T08:00:00+00:00",
    "end": "2015-03-01T13:00:00+00:00",
    "what": "Mens haircut",
    "where": "Sesame St, Middleburg, FL 32068, USA",
    "calendar_id": ":calendar-id",
    "description": "Please arrive 10 minutes before you time begin"
  },
  "customer": {
    "name": "Marty McFly",
    "email": "[email protected]",
    "phone": "1-591-001-5403",
    "voip": "McFly",
    "timezone": "America/Los_Angeles"
  }
}).then(function(response) {
	console.log(response)
})
API calls and resource context
Note that all API requests should be done in context of the host/provider resource (using the corresponding Authentication headers). This ensures that the booking belongs to them and can be retrieved later.
Availability and timeslots
Note that retrieving availability for a host/provider using FindTime is the exact same process as always. Chosen timeslot info are simply passed to the "event" key instead of calling [POST] /events directly
This will 1) create a new booking entity and 2) perform the "create" action on it immediately. The create action requires "event" and "customer" data, as it will save that to the Timekit DB.
You should get a response similar to this:
// Response example
// [POST] /bookings
{
  "data": {
    "id": "58190fc6-1ec0-4ebb-b627-7ce6aa9fc703",
    "graph": "confirm_decline",
    "state": "tentative",
    "completed": false,
    "possible_actions": [
      "decline",
      "confirm"
    ],
    "created_at": "2016-02-11T11:58:45+0100",
    "updated_at": "2016-02-11T11:58:47+0100",
    "attributes": {
      "event_info": {
        "start": "2015-03-01T08:00:00+00:00",
        "end": "2015-03-01T13:00:00+00:00",
        "what": "Mens haircut",
        "where": "Sesame St, Middleburg, FL 32068, USA",
        "description": "Please arrive 10 minutes before you time begin"
      }
    },
    "calendar": {
      "id": "c91c5d04-2a57-46c0-ab35-e489dadf132e",
      "name": "My calendar",
      "display_name": "My calendar",
      "description": "Ut adipisci non autem cum ut id.",
      "foregroundcolor": "#25d6be",
      "backgroundcolor": "#ea1cb8",
      "created_at": "2016-02-15T13:21:42+0100",
      "updated_at": "2016-02-15T13:21:42+0100"
    },
    "customers": [
      {
        "id": "a728e860-99c7-4009-8843-7d9ac5d7f53f",
        "name": "Marty McFly",
        "email": "[email protected]",
        "phone": "1-591-001-5403",
        "voip": "McFly",
        "timezone": "America/Los_Angeles"
      }
    ]
  }
}
The booking is now in the "tentative" state. If we take a look at the diagram again, we can see that it has performed the following autoplay actions:
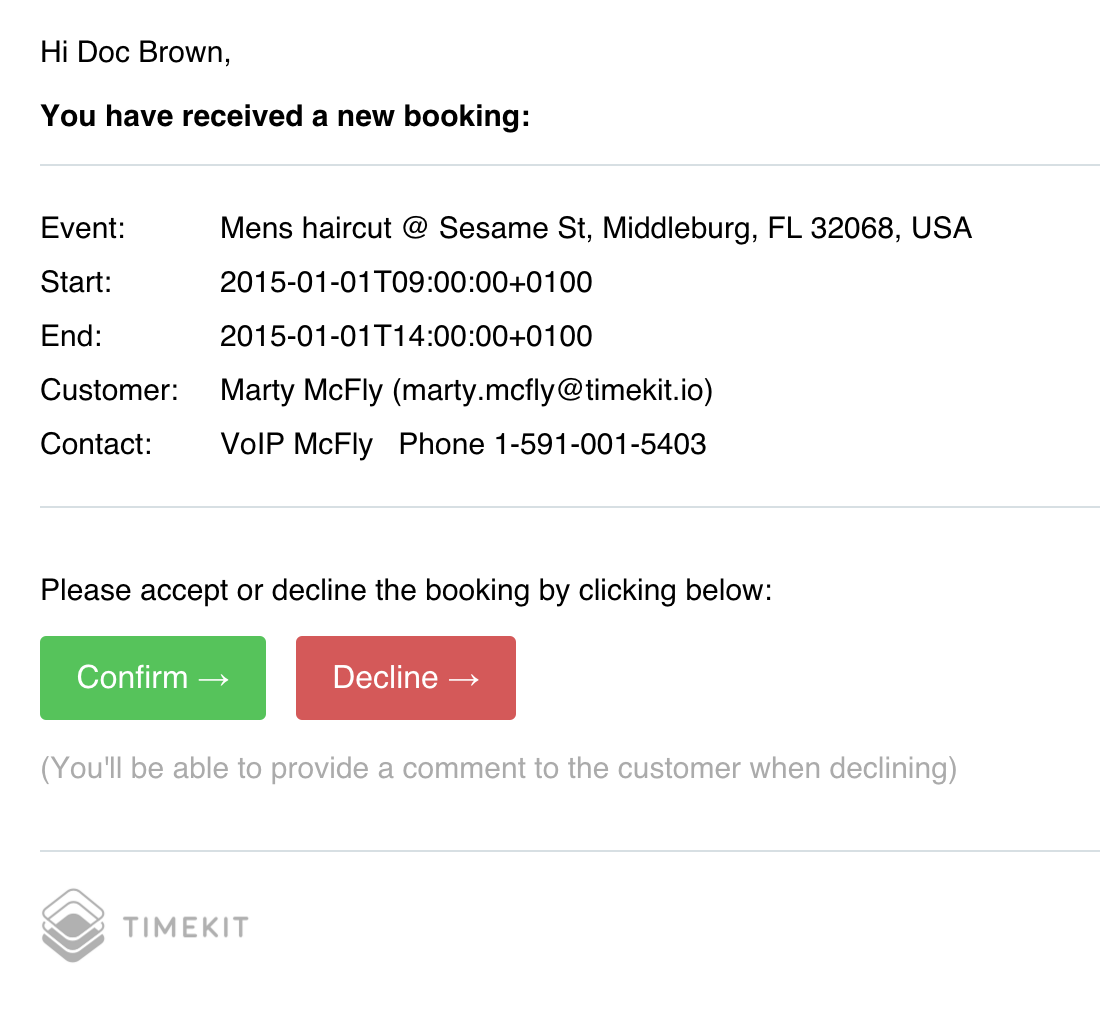
save_customer_data- validate and save the customer info provided in the "customer" keysave_booking_data- validate and save the event info provided in the "event" key (this will be used for creating the calendar event later)send_confirm_decline_email_to_owner- sends out an email to the owner of the booking (service provider) based on a email template
The email sent looks something like this:

Notification email sent to owner
The "Confirm" and "Decline" buttons currently links to a page in the new Timekit Admin that will call the relevant [PUT] /bookings/:id/:action endpoint when visited. It's a simple solution for those who just want to get quickly up and running (e.g. using Booking.js without a custom integration). If you want to sent your own emails, you can disable the default ones when you create the booking and use webhooks to know when a booking has been created. Disabling the action looks like this:
# Request example (replace :calendar-id)
# [POST] /bookings
curl -X POST \
     -H 'Timekit-App: back-to-the-future' \
     -u [email protected]:nvHfRSlhvsnlg4rS7Wt28Ty47qdgegwSu3YK7hPW \
     -d '{
          "graph": "confirm_decline",
          "action": "create",
          "send_confirm_decline_email_to_owner": {
          	"enabled": false
          }
          ...
        }' \
     https://api.timekit.io/v2/bookings
For now, we'll keep it enabled to prove the point.
2a. Performing an action: decline
If you have your own admin panel, where your users/resources can manage their bookings, allowing them to confirm/decline a booking is very easy through the API. You can decline a booking with the PUT /bookings/:id/:action endpoint using the decline action. It looks like this:
# Request example (replace :id)
# [PUT] /bookings/:id/decline
curl -X POST \
     -H 'Timekit-App: back-to-the-future' \
     -u [email protected]:nvHfRSlhvsnlg4rS7Wt28Ty47qdgegwSu3YK7hPW \
     -d '{
          "notify_customer_declined_by_email": {
				    "message": "Sorry, I'm not available at that location"
				  }
        }' \
     https://api.timekit.io/v2/bookings/:id/decline
// Request example
// [PUT] /bookings/:id/decline

var timekit = require('timekit-sdk');

timekit.configure({
  app: 'docs'
  outputTimestampFormat: 'Y-m-d H:i:s'
});

timekit.setUser([email protected], FluxCapacitator);

timekit.updateBooking({
  "notify_customer_declined_by_email": {
    "message": "Sorry, I'm not available at that location"
  }
}).then(function(response) {
	console.log(response)
})
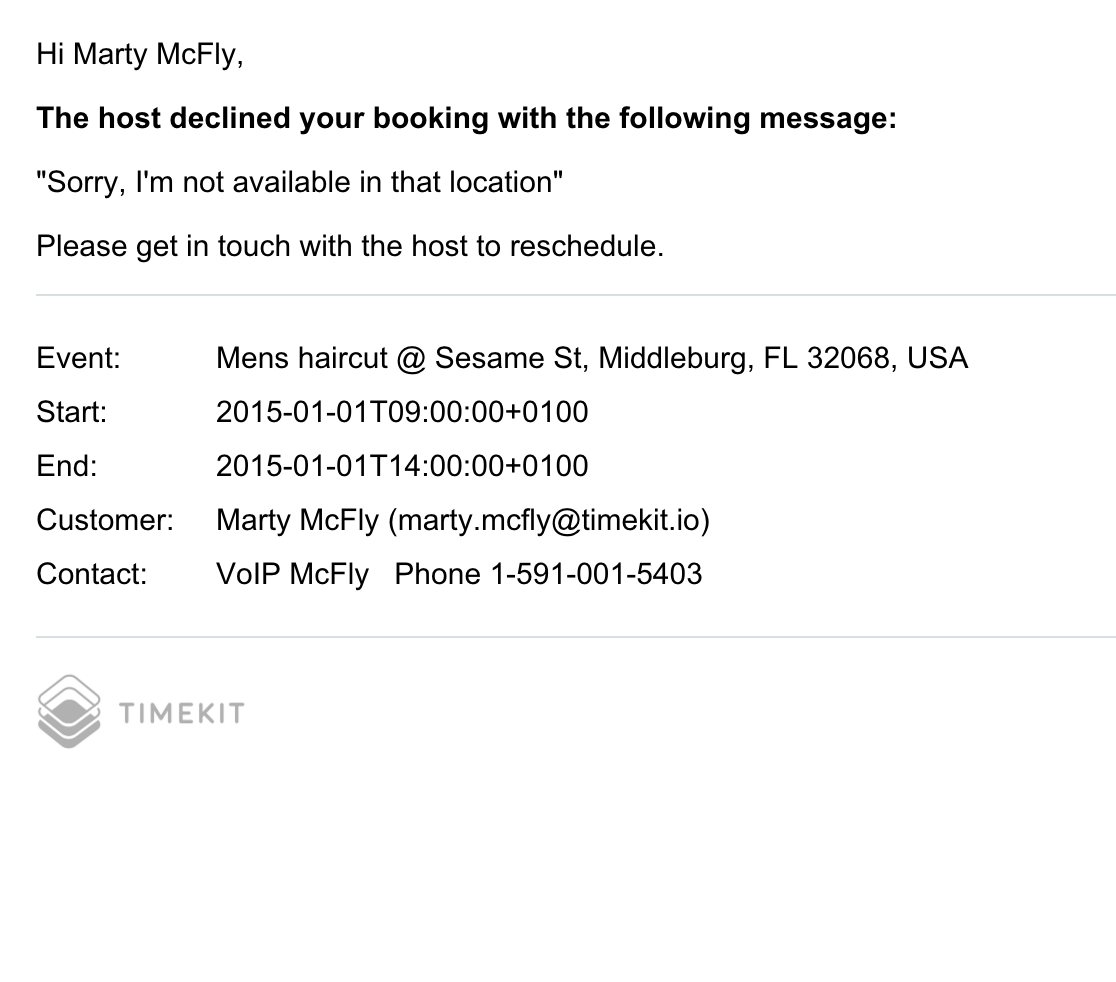
This will trigger the decline steps as shown in the diagram and when it hits the notify_customer_declined_by_email step, it will use the message you provide in the request and add it to the email.
The resulting email will look something like this:

Notification email sent to customer
If you need to customize this step and use your own emails, you should read about Emails & webhooks.
2b. Performing an action: confirm
If we assumed that the owner wanted to confirm the booking instead, you would call [PUT] /bookings/:id/confirm and the booking would follow the steps in that branch.
The main action of interest here is the create_event. This will, as expected, create a Timekit event with the data provided in the "event" key when you created the booking (similar to calling [POST] /events). This plays nicely together with FindTime availability, as the event now blocks for the availability like you'd normally expect.
Creating events in Google calendars
If Doc Brown (mentor) is connected using a Google Calendar, he would automatically have an event pushed into his calendar. If Marty McFly (mentee) also is created as Timekit user/resource with a Google account, he would get a event invite directly inside Google calendar that he can RSVP to.
3. Retrieving booking data
The booking engine saves a complete audit trail of all actions and state changes performed throughout the lifetime of a booking. Call the [GET] /bookings to get all your bookings and their associated meta-data.
// Response example
// [GET] /bookings
{
  "data": {
    "id": "f68979ff-27da-4afd-8d0c-847f9340331b",
    "state": "declined",
    "graph": "confirm_decline",
    "completed": true,
    "possible_actions": [],
    "created_at": "2016-02-11T12:39:45+0100",
    "updated_at": "2016-02-11T13:12:01+0100",
    "attributes": {
      "event_info": {
        "start": "2015-01-01T09:00:00+0100",
        "end": "2015-01-01T14:00:00+0100",
        "what": "Mens haircut",
        "where": "Sesame St, Middleburg, FL 32068, USA",
        "description": "Please arrive 10 minutes before you time begin"
      }
    },
    "calendar": {
      "id": "c91c5d04-2a57-46c0-ab35-e489dadf132e",
      "name": "My calendar",
      "display_name": "My calendar",
      "description": "Ut adipisci non autem cum ut id.",
      "foregroundcolor": "#25d6be",
      "backgroundcolor": "#ea1cb8",
      "created_at": "2016-02-15T13:21:42+0100",
      "updated_at": "2016-02-15T13:21:42+0100"
    },
    "customers": [
      {
        "id": "a728e860-99c7-4009-8843-7d9ac5d7f53f",
        "name": "Marty McFly",
        "email": "[email protected]",
        "phone": "1-591-001-5403",
        "voip": "McFly",
        "timezone": "America/Los_Angeles"
      }
    ],
    "logs": [
      {
        "description": "Changed state to: created",
        "success": "true",
        "state": "created",
        "data": "[]",
        "created_at": "2016-02-11T12:39:45+0100"
      },
      {
        "description": "Changed state to: customer_data_saved",
        "success": "true",
        "state": "customer_data_saved",
        "data": "[]",
        "created_at": "2016-02-11T12:39:45+0100"
      },
      {
        "description": "Updated booking object with success",
        "success": "true",
        "state": "customer_data_saved",
        "data": "[]",
        "created_at": "2016-02-11T12:39:45+0100"
      },
      {
        "description": "Changed state to: booking_data_saved",
        "success": "true",
        "state": "booking_data_saved",
        "data": "[]",
        "created_at": "2016-02-11T12:39:45+0100"
      },
      {
        "description": "Trying to send (confirm/decline) email to owner ([email protected])...",
        "success": "true",
        "state": "booking_data_saved",
        "data": "[]",
        "created_at": "2016-02-11T12:39:45+0100"
      },
      {
        "description": "Email sent to [email protected]!",
        "success": "true",
        "state": "booking_data_saved",
        "data": "[]",
        "created_at": "2016-02-11T12:39:46+0100"
      },
      {
        "description": "Changed state to: notified_owner_by_action_email",
        "success": "true",
        "state": "notified_owner_by_action_email",
        "data": "[]",
        "created_at": "2016-02-11T12:39:46+0100"
      },
      {
        "description": "Changed state to: tentative",
        "success": "true",
        "state": "tentative",
        "data": "[]",
        "created_at": "2016-02-11T12:39:46+0100"
      },
      {
        "description": "Booking was rejected by: [email protected]",
        "success": "true",
        "state": "tentative",
        "data": "[]",
        "created_at": "2016-02-11T13:11:59+0100"
      },
      {
        "description": "Changed state to: declining",
        "success": "true",
        "state": "declining",
        "data": "[]",
        "created_at": "2016-02-11T13:11:59+0100"
      },
      {
        "description": "Trying to send (declined notification) email to customer ([email protected])...",
        "success": "true",
        "state": "declining",
        "data": "[]",
        "created_at": "2016-02-11T13:11:59+0100"
      },
      {
        "description": "Email sent to [email protected]!",
        "success": "true",
        "state": "declining",
        "data": "[]",
        "created_at": "2016-02-11T13:12:01+0100"
      },
      {
        "description": "Changed state to: notified_customer_declined_by_email",
        "success": "true",
        "state": "notified_customer_declined_by_email",
        "data": "[]",
        "created_at": "2016-02-11T13:12:01+0100"
      },
      {
        "description": "Changed state to: declined",
        "success": "true",
        "state": "declined",
        "data": "[]",
        "created_at": "2016-02-11T13:12:01+0100"
      }
    ]
  }
}
Great scott, you've finished our guide! We hope that our booking engine makes sense to you and that you are ready to dive in. If not, hit us up on the chat and we'll help you get started.
Updated over 7 years ago
